注意
转到结尾下载完整的示例代码。或者通过 Binder 在浏览器中运行此示例
欧拉数#
此示例展示了 2D 和 3D 对象中欧拉数的计算。[1]
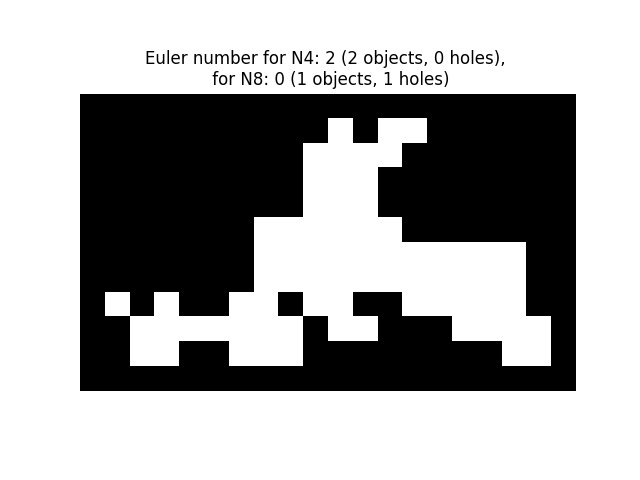
对于 2D 对象,欧拉数是对象数减去孔数。请注意,如果为对象考虑 8 个连通像素(2 连通性)的邻域,则这相当于为互补集(孔、背景)考虑 4 个连通像素(1 连通性)的邻域,反之亦然。也可以使用 skimage.measure.label() 计算对象数,并从这两个数字之间的差值推断出孔数。
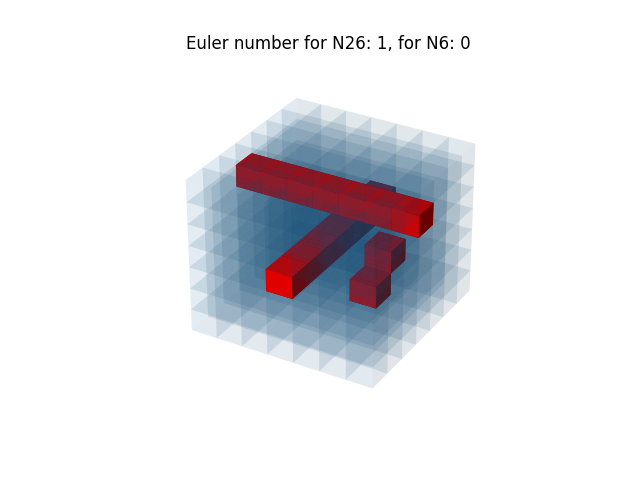
对于 3D 对象,欧拉数是对象数加上孔数,减去隧道数或环路数。如果对一个对象使用 3 连通性(将周围的 26 个体素视为其邻域),这对应于对互补集(孔、背景)使用 1 连通性,即仅考虑给定体素的 6 个邻居。体素在这里用蓝色透明表面表示。内部孔隙用红色表示。
from skimage.measure import euler_number, label
import matplotlib.pyplot as plt
import numpy as np


# Sample image.
SAMPLE = np.array(
    [
        [0, 0, 0, 0, 0, 0, 0, 0, 0, 1, 0, 1, 1, 0, 0, 0, 0, 0],
        [0, 0, 0, 0, 0, 0, 0, 0, 1, 1, 1, 1, 0, 0, 0, 0, 0, 0],
        [0, 0, 0, 0, 0, 0, 0, 0, 1, 1, 1, 0, 0, 0, 0, 0, 0, 0],
        [0, 0, 0, 0, 0, 0, 0, 0, 1, 1, 1, 0, 0, 0, 0, 0, 0, 0],
        [0, 0, 0, 0, 0, 0, 1, 1, 1, 1, 1, 1, 0, 0, 0, 0, 0, 0],
        [0, 0, 0, 0, 0, 0, 1, 1, 1, 1, 1, 1, 1, 1, 1, 1, 1, 0],
        [0, 0, 0, 0, 0, 0, 1, 1, 1, 1, 1, 1, 1, 1, 1, 1, 1, 0],
        [1, 0, 1, 0, 0, 1, 1, 0, 1, 1, 0, 0, 1, 1, 1, 1, 1, 0],
        [0, 1, 1, 1, 1, 1, 1, 1, 0, 1, 1, 0, 0, 0, 1, 1, 1, 1],
        [0, 1, 1, 0, 0, 1, 1, 1, 0, 0, 0, 0, 0, 0, 0, 0, 1, 1],
    ]
)
SAMPLE = np.pad(SAMPLE, 1, mode='constant')

fig, ax = plt.subplots()
ax.imshow(SAMPLE, cmap=plt.cm.gray)
ax.axis('off')
e4 = euler_number(SAMPLE, connectivity=1)
object_nb_4 = label(SAMPLE, connectivity=1).max()
holes_nb_4 = object_nb_4 - e4
e8 = euler_number(SAMPLE, connectivity=2)
object_nb_8 = label(SAMPLE, connectivity=2).max()
holes_nb_8 = object_nb_8 - e8
ax.set_title(
    f'Euler number for N4: {e4} ({object_nb_4} objects, {holes_nb_4} '
    f'holes), \n for N8: {e8} ({object_nb_8} objects, '
    f'{holes_nb_8} holes)'
)
plt.show()

3-D 对象#
在此示例中,生成一个 3D 立方体,然后添加孔和隧道。使用 6 和 26 邻域配置评估欧拉数。此代码受到 https://matplotlib.net.cn/devdocs/gallery/mplot3d/voxels_numpy_logo.html 的启发
def make_ax(grid=False):
    ax = plt.figure().add_subplot(projection='3d')
    ax.grid(grid)
    ax.set_axis_off()
    return ax


def explode(data):
    """visualization to separate voxels

    Data voxels are separated by 0-valued ones so that they appear
    separated in the matplotlib figure.
    """
    size = np.array(data.shape) * 2
    data_e = np.zeros(size - 1, dtype=data.dtype)
    data_e[::2, ::2, ::2] = data
    return data_e


# shrink the gaps between voxels


def expand_coordinates(indices):
    """
    This collapses together pairs of indices, so that
    the gaps in the volume array will have a zero width.
    """
    x, y, z = indices
    x[1::2, :, :] += 1
    y[:, 1::2, :] += 1
    z[:, :, 1::2] += 1
    return x, y, z


def display_voxels(volume):
    """
    volume: (N,M,P) array
            Represents a binary set of pixels: objects are marked with 1,
            complementary (porosities) with 0.

    The voxels are actually represented with blue transparent surfaces.
    Inner porosities are represented in red.
    """

    # define colors
    red = '#ff0000ff'
    blue = '#1f77b410'

    # upscale the above voxel image, leaving gaps
    filled = explode(np.ones(volume.shape))

    fcolors = explode(np.where(volume, blue, red))

    # Shrink the gaps
    x, y, z = expand_coordinates(np.indices(np.array(filled.shape) + 1))

    # Define 3D figure and place voxels
    ax = make_ax()
    ax.voxels(x, y, z, filled, facecolors=fcolors)
    # Compute Euler number in 6 and 26 neighborhood configuration, that
    # correspond to 1 and 3 connectivity, respectively
    e26 = euler_number(volume, connectivity=3)
    e6 = euler_number(volume, connectivity=1)
    plt.title(f'Euler number for N26: {e26}, for N6: {e6}')
    plt.show()


# Define a volume of 7x7x7 voxels
n = 7
cube = np.ones((n, n, n), dtype=bool)
# Add a tunnel
c = int(n / 2)
cube[c, :, c] = False
# Add a new hole
cube[int(3 * n / 4), c - 1, c - 1] = False
# Add a hole in neighborhood of previous one
cube[int(3 * n / 4), c, c] = False
# Add a second tunnel
cube[:, c, int(3 * n / 4)] = False
display_voxels(cube)

脚本的总运行时间:(0 分钟 1.065 秒)
